 The Daily
Know Your Penalty Area Relief Options
Disclosure: Some links on this page are affiliate links. If you buy through them we may earn a commission at no extra cost to you. As an Amazon Associate I earn from qualifying purchases. Learn more.
Water, ravines, desert and thick native areas marked by red or yellow stakes or lines are all penalty areas under the Rules of Golf. Hitting into one doesn’t have to mean a big number. Plenty of strokes are lost not to the water itself but to the wrong drop: going back too far, dropping on the wrong side, or using a red-stake option on a yellow-stake hazard. Here’s how to read the stakes and pick the option that costs you the least.
🛒 Gear that helps with this: Alignment Sticks (2-pack) — The cheapest, most useful practice tool in golf: check aim, ball position and gate drills.
How to do it
1. Know what counts as a penalty area. Under Rule 17, a penalty area is any body of water on the course, marked or not, plus any other area the committee marks with red or yellow stakes or lines. Your ball is in the penalty area when any part of it touches the ground or anything else inside the edge, or sits above the edge. The stakes and lines are part of the penalty area.
2. You can play it as it lies. If your ball is in a penalty area and you can hit it, you’re allowed to, with no penalty. Since 2019, the same Rules apply as in the general area. The USGA points out that you can ground your club behind the ball, take practice swings that touch the ground and remove loose impediments like leaves and twigs. Only try it when the shot is realistic. A ball sitting in shallow water is rarely as easy as it looks.
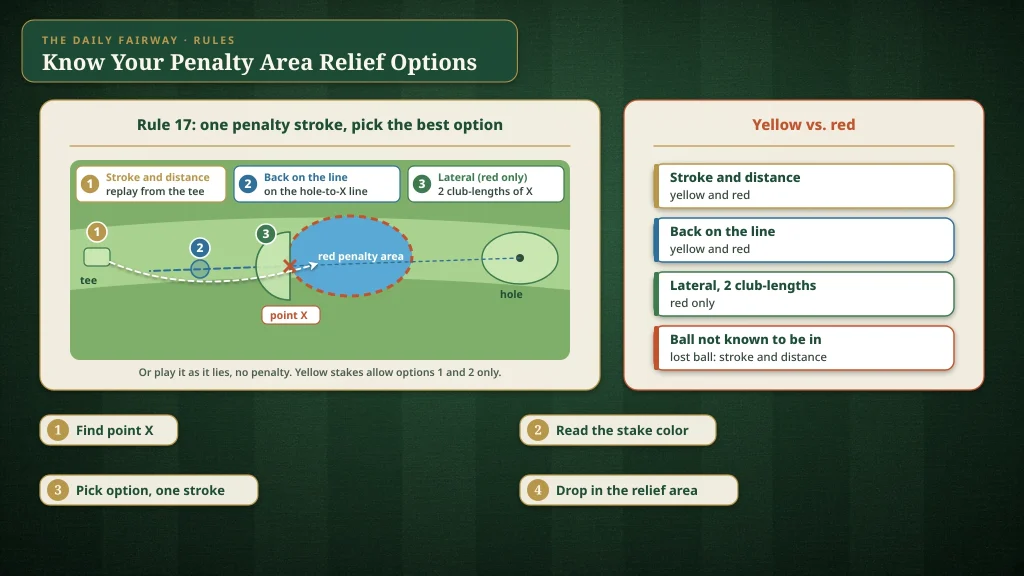
3. Find point X before you choose. Every relief option except going back to where you just played starts from the estimated point where your ball last crossed the edge of the penalty area. Watch your ball all the way, and agree on that point with your group. The R&A diagrams call it point X. It’s where the ball crossed into the area, not where it splashed down, and that difference matters when a ball curves in from the side.
4. Yellow stakes: two options, one stroke each. According to the USGA, a yellow penalty area gives you two relief options, each for one penalty stroke. Stroke and distance: play again from where you hit your last shot (from the tee, you can tee it up again). Back on the line: keep point X between the hole and where you drop, going straight back on that line as far as you like. Put a tee in the ground on the line to mark your reference point, then drop within one club-length of it, no nearer the hole, outside the penalty area.
5. Red stakes: add lateral relief. A red penalty area gives you the same two options, plus a third. Lateral relief: drop within two club-lengths of point X, no nearer the hole and outside the penalty area. This is usually the quickest choice and often leaves you closest to the hole. You can’t use it for a yellow penalty area. Some courses also allow dropping on the opposite side of a red penalty area, but only when a local rule says so; check the scorecard.
🛒 Many golfers practice this with Rukket Haack Practice Net — A backyard hitting net for full swings, so you can groove a move between range visits.
6. Use the drop right. For every drop, hold the ball at knee height, let it fall straight down, and make sure it comes to rest in the relief area. Your relief area can’t be in the same penalty area. Since the penalty is one stroke no matter which option you pick, choose the spot that gives you the best next shot, not the one that’s closest to where you’re standing.
7. Know where your ball really went. You can take penalty area relief for a ball you can’t find only if it’s known or virtually certain it ended up in the penalty area, for example when you saw it splash. If you just think it might be in there and it could be lost in long grass nearby, it’s a lost ball, and you’re back to stroke and distance. The USGA also notes you can’t hit a provisional for a ball that could only be lost in a penalty area, but you can if it might be lost outside it.
8. Remember what you can’t do in there. When your ball is in a penalty area, there’s no free relief from things like a bridge or a sprinkler box, no embedded-ball relief and no unplayable-ball option. Your choices are to play it as it lies or take one of the penalty relief options above.
9. Pick the smart option. On a short par 3 over water, re-teeing under stroke and distance often beats a long, awkward back-on-the-line drop. On a red-staked creek running along a fairway, lateral relief usually leaves the easiest next shot. When back on the line gives you a full-swing yardage you like, going a few steps farther back is allowed and can be smarter than dropping right at the edge.
Practice: On your next casual round, every time you pass red or yellow stakes, ask yourself where point X would be and which option you’d take. Pace off one and two club-lengths with your driver a few times so you know how much room each option really gives you.
Top picks for this tip
- 1
Alignment Sticks (2-pack)
Training Aids
The cheapest, most useful practice tool in golf: check aim, ball position and gate drills.
- 2
Rukket Haack Practice Net
Training Aids
A backyard hitting net for full swings, so you can groove a move between range visits.
- 3
PuttOut Pressure Putt Trainer
Training Aids
A compact target that only keeps putts hit at the right speed. Great for the ladder and lag drills.
Watch it
Red Vs Yellow Stakes: Golf Penalty Areas Explained! — Golf Monthly
Sources & further reading
- Rules of Golf, Rule 17: Penalty Areas · R&A
Relief options for one penalty stroke: stroke and distance, back-on-the-line, and lateral relief within two club-lengths for red penalty areas; known or virtually certain requirement. - Rules Hub: Penalty Areas · USGA
You may play the ball as it lies, ground your club and remove loose impediments; no unplayable or free obstruction relief for a ball in a penalty area. - Rule 17: Penalty Areas (full text and interpretations) · USGA
Full rule, including how the back-on-the-line reference point and relief area are set and the Model Local Rule for opposite-side relief.
FAQ
What is the "Know Your Penalty Area Relief Options" golf tip about?
Water, ravines, desert and thick native areas marked by red or yellow stakes or lines are all penalty areas under the Rules of Golf. Hitting into one doesn’t have to mean a big number. Plenty of strokes are lost not to the water itself but to the wrong drop: going back too far, dropping on the wrong side, or using a red-stake option on a yellow-stake hazard. Here’s how to read the stakes and pick the option that costs you the least.
How do I put it into practice?
Know what counts as a penalty area. Under Rule 17, a penalty area is any body of water on the course, marked or not, plus any other area the committee marks with red or yellow stakes or lines. Your ball is in the penalty area when any part of it touches the ground or anything else inside the edge, or sits above the edge. The stakes and lines are part of the penalty area.
What’s the key takeaway?
Practice: On your next casual round, every time you pass red or yellow stakes, ask yourself where point X would be and which option you’d take. Pace off one and two club-lengths with your driver a few times so you know how much room each option really gives you.
Ready to practice this? Our top pick for this tip is the Alignment Sticks (2-pack).
